
Start your first test subscription
In this tutorial you build a small Vue app that sells two monthly plans, Basic at €5 and Pro at €15. You create the plans in Stripe with a script, write a Node server that creates a subscription for the customer, collect the first payment with Stripe's payment form, and then read the subscription's status back from Stripe. You pay with a card that succeeds, a card that asks for 3D Secure and a card that is declined, and at the end you cancel the subscription.
It takes about 45 minutes. No real money moves: everything runs in Stripe's test mode.
If you have not used Vue Stripe before, take your first test payment first. This tutorial builds the same kind of app and explains less of the setup.
To skip ahead, examples/subscriptions is a complete app of the same flow, with its own plans and error handling. You can also open it in StackBlitz.
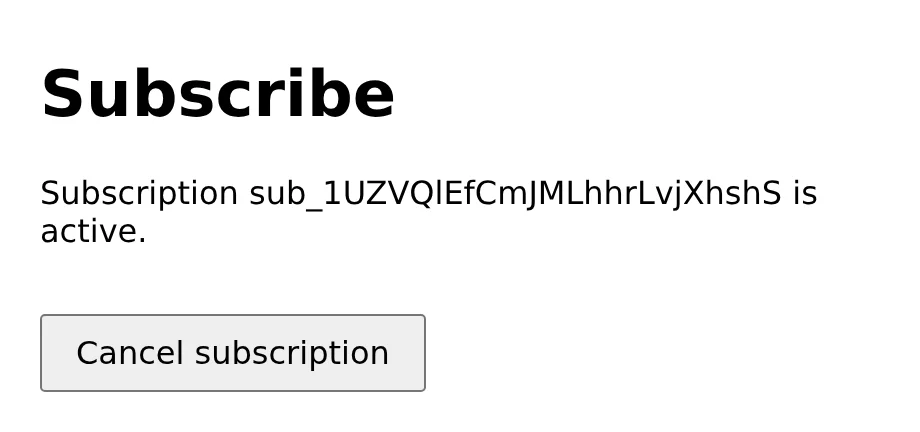
This is what your app looks like at the end:
Before you start
You need:
- Node.js 20.19 or later. Check with
node --version. - A Stripe account. Sign up at dashboard.stripe.com/register; you can use test mode right away.
- Your two test API keys from API keys in the Stripe Dashboard: the publishable key (
pk_test_...) and the secret key (sk_test_...).
Step 1: Create the app
Create a Vue app with Vite. If npm asks Ok to proceed? (y), type y and press Enter:
npm create vite@latest subscriptions -- --template vue --no-immediateGo into the folder and install the app's packages, then Vue Stripe, Stripe.js and Stripe's Node library:
cd subscriptions
npm install
npm install @vue-stripe/vue-stripe@^6 @stripe/stripe-js@^10 stripe
Check that they are installed:
npm ls --depth=0Your version numbers can be higher; @vue-stripe/vue-stripe must be 6 and @stripe/stripe-js must be 10:
subscriptions@0.0.0 /home/you/subscriptions
├── @stripe/stripe-js@10.x.x
├── @vitejs/plugin-vue@6.x.x
├── @vue-stripe/vue-stripe@6.x.x
├── stripe@23.x.x
├── vite@8.x.x
└── vue@3.x.x
Step 2: Add your test keys
In the subscriptions folder, create a file named .env.local with your two keys:
VITE_STRIPE_PUBLISHABLE_KEY=pk_test_...
STRIPE_SECRET_KEY=sk_test_...
Vite gives the browser only the variables that start with VITE_, so your secret key stays on the server. The .gitignore file that Vite created already ignores *.local files.
Step 3: Create the plans
A subscription bills a price: an amount, a currency and how often to charge it. Each price belongs to a product, the thing you sell. You create one product with one monthly price for each plan.
Create create-plans.mjs in the subscriptions folder:
import Stripe from 'stripe'

const stripe = new Stripe(process.env.STRIPE_SECRET_KEY)

const plans = [
  { name: 'Basic', amount: 500, lookupKey: 'basic_monthly' },
  { name: 'Pro', amount: 1500, lookupKey: 'pro_monthly' }
]

for (const plan of plans) {
  const price = await stripe.prices.create({
    product_data: { name: plan.name },
    unit_amount: plan.amount,
    currency: 'eur',
    recurring: { interval: 'month' },
    lookup_key: plan.lookupKey,
    transfer_lookup_key: true // running the script again moves the key to the new price
  })
  console.log(`${plan.name}: ${price.id}`)
}
recurring is what makes a price a subscription price. The lookup key is a name you choose, so your server can find the price without copying its ID into the code.
Run the script once:
node --env-file=.env.local create-plans.mjsIt prints the ID of each new price:
Basic: price_1UZVLaEfCmJMLhhrHxuaE3Z6
Pro: price_1UZVLaEfCmJMLhhrknDNtMUH
Open Product catalog in the Stripe Dashboard. It lists Basic at €5.00 per month and Pro at €15.00 per month. You can also create products and prices there by hand; give each price one of the lookup keys above, so the server in the next step finds it.
Step 4: Write the server
Your server reads the plans from Stripe, so the app can show them. Create server.mjs:
import { createServer } from 'node:http'
import Stripe from 'stripe'

const stripe = new Stripe(process.env.STRIPE_SECRET_KEY)

function sendJson(res, data) {
  res.setHeader('Content-Type', 'application/json')
  res.end(JSON.stringify(data))
}

const server = createServer(async (req, res) => {
  if (req.method === 'GET' && req.url === '/api/plans') {
    const prices = await stripe.prices.list({
      lookup_keys: ['basic_monthly', 'pro_monthly'],
      expand: ['data.product']
    })
    const plans = prices.data
      .map((price) => ({ priceId: price.id, name: price.product.name, amount: price.unit_amount }))
      .sort((a, b) => a.amount - b.amount)
    sendJson(res, plans)
    return
  }

  res.statusCode = 404
  res.end()
})

server.listen(3000, () => console.log('Server ready on http://localhost:3000'))
Start it, passing your keys file:
node --env-file=.env.local server.mjsServer ready on http://localhost:3000Leave this terminal open. In a second terminal in the subscriptions folder, ask for the plans:
curl http://localhost:3000/api/plans[{"priceId":"price_1UZVLaEfCmJMLhhrHxuaE3Z6","name":"Basic","amount":500},{"priceId":"price_1UZVLaEfCmJMLhhrknDNtMUH","name":"Pro","amount":1500}]Now let the app reach the server. Replace the contents of vite.config.js:
import vue from '@vitejs/plugin-vue'
import { defineConfig } from 'vite'

export default defineConfig({
  plugins: [vue()],
  server: {
    // Send the app's /api requests to the server from step 4.
    proxy: { '/api': 'http://localhost:3000' }
  }
})
Step 5: Show the plans
Replace the contents of src/main.js, so the app loads Vue Stripe's stylesheet in place of the welcome page's styles:
import { createApp } from 'vue'
import '@vue-stripe/vue-stripe/style.css'
import App from './App.vue'

createApp(App).mount('#app')
Replace the contents of src/App.vue. It loads the plans and lets the customer pick one and enter an email address:
<script setup>
import { ref, onMounted } from 'vue'

const plans = ref([])
const priceId = ref('')
const email = ref('')

onMounted(async () => {
  const response = await fetch('/api/plans')
  plans.value = await response.json()
  priceId.value = plans.value[0].priceId
})
</script>

<template>
  <main>
    <h1>Subscribe</h1>
    <form>
      <label v-for="plan in plans" :key="plan.priceId">
        <input v-model="priceId" type="radio" :value="plan.priceId" />
        {{ plan.name }}: €{{ plan.amount / 100 }} a month
      </label>
      <input v-model="email" type="email" placeholder="Email" required />
      <button>Continue</button>
    </form>
  </main>
</template>

<style>
main {
  max-width: 420px;
  margin: 48px auto;
  font-family: system-ui, sans-serif;
}
form label,
form input[type='email'] {
  display: block;
  margin: 12px 0;
}
button {
  margin: 16px 0;
  padding: 8px 16px;
  font-size: 16px;
}
</style>
In the second terminal, start the app:
npm run devOpen http://localhost:5173 in your browser. You see both plans, with Basic selected:

Continue does nothing useful yet. If the page shows only the heading, check that the server from step 4 is still running.
Step 6: Create the subscription
When the customer clicks Continue, your server creates the subscription. Stripe then creates the first invoice and a PaymentIntent to pay it, so you never create a PaymentIntent yourself: the app gets the client secret of the one Stripe made.
Stop the server with Ctrl+C in the first terminal. In server.mjs, add this function under sendJson, to read the JSON the app sends:
async function readJson(req) {
  let body = ''
  for await (const chunk of req) body += chunk
  return JSON.parse(body)
}
Then add this block above the line res.statusCode = 404:
  if (req.method === 'POST' && req.url === '/api/subscriptions') {
    const { email, priceId } = await readJson(req)

    // Reuse the Stripe customer for this email, so one person is one customer
    const existing = await stripe.customers.list({ email, limit: 1 })
    const customer = existing.data[0] ?? (await stripe.customers.create({ email }))

    const subscription = await stripe.subscriptions.create({
      customer: customer.id,
      items: [{ price: priceId }],
      payment_behavior: 'default_incomplete',
      payment_settings: { save_default_payment_method: 'on_subscription' },
      expand: ['latest_invoice.confirmation_secret']
    })
    console.log('Created', subscription.id, 'for', customer.id)
    sendJson(res, {
      subscriptionId: subscription.id,
      clientSecret: subscription.latest_invoice.confirmation_secret.client_secret
    })
    return
  }
What each option does:
customer: every subscription belongs to a customer. Stripe does not match customers by email for you, so the server looks for one first; without that, every subscription would get a new customer.payment_behavior: 'default_incomplete': the subscription waits in the statusincompleteuntil the customer pays the first invoice, instead of failing because there is no card yet.save_default_payment_method: 'on_subscription': the card the customer pays with is saved on the subscription and charged every month.expand: ['latest_invoice.confirmation_secret']: the response includes the client secret of the first invoice's payment, which the Payment Element needs.
Start the server again:
node --env-file=.env.local server.mjsOpen a third terminal in the subscriptions folder and create a subscription with curl, using the Basic price ID from step 3:
curl -X POST http://localhost:3000/api/subscriptions \
  -H 'Content-Type: application/json' \
  -d '{"email":"ada@example.com","priceId":"price_1UZVLaEfCmJMLhhrHxuaE3Z6"}'
You get back the subscription's ID and the client secret:
{"subscriptionId":"sub_1UZVLvEfCmJMLhhrGgGlmhRX","clientSecret":"pi_3UZVLvEfCmJMLhhr1fxa0cA7_secret_..."}The first terminal prints the subscription and the customer it belongs to:
Created sub_1UZVLvEfCmJMLhhrGgGlmhRX for cus_VagjFP8GZVGymsNobody pays this subscription, so it stays incomplete, and Stripe marks it incomplete_expired after 23 hours.
Now use the endpoint from the app. Replace src/App.vue. Continue now creates the subscription, and the app shows the Payment Element for its first payment:
<script setup>
import { ref, onMounted } from 'vue'
import {
  VueStripeProvider,
  VueStripeElements,
  VueStripePaymentElement
} from '@vue-stripe/vue-stripe'

const publishableKey = import.meta.env.VITE_STRIPE_PUBLISHABLE_KEY
const plans = ref([])
const priceId = ref('')
const email = ref('')
const subscriptionId = ref('')
const clientSecret = ref('')

onMounted(async () => {
  const response = await fetch('/api/plans')
  plans.value = await response.json()
  priceId.value = plans.value[0].priceId
})

async function startSubscription() {
  const response = await fetch('/api/subscriptions', {
    method: 'POST',
    headers: { 'Content-Type': 'application/json' },
    body: JSON.stringify({ email: email.value, priceId: priceId.value })
  })
  const data = await response.json()
  subscriptionId.value = data.subscriptionId
  clientSecret.value = data.clientSecret
}
</script>

<template>
  <main>
    <h1>Subscribe</h1>
    <form v-if="!clientSecret" @submit.prevent="startSubscription">
      <label v-for="plan in plans" :key="plan.priceId">
        <input v-model="priceId" type="radio" :value="plan.priceId" />
        {{ plan.name }}: €{{ plan.amount / 100 }} a month
      </label>
      <input v-model="email" type="email" placeholder="Email" required />
      <button>Continue</button>
    </form>

    <VueStripeProvider v-else :publishable-key="publishableKey">
      <VueStripeElements :client-secret="clientSecret">
        <VueStripePaymentElement />
      </VueStripeElements>
    </VueStripeProvider>
  </main>
</template>

<style>
main {
  max-width: 420px;
  margin: 48px auto;
  font-family: system-ui, sans-serif;
}
form label,
form input[type='email'] {
  display: block;
  margin: 12px 0;
}
button {
  margin: 16px 0;
  padding: 8px 16px;
  font-size: 16px;
}
</style>
The page reloads. Enter ada@example.com, keep Basic and click Continue. The form is replaced by Stripe's payment methods, for example Card and SEPA Debit; the list depends on your Stripe account. The first terminal prints another Created sub_... for cus_... line, with the same customer ID as the curl request.
Click Card. Under the card fields, Stripe shows a line like "By providing your card information, you allow Vue Stripe to charge your card for future payments in accordance with their terms.", with your own business name. Stripe adds it because the card is saved for the monthly charges.
Step 7: Pay and read the result
Create src/SubscribeButton.vue. It confirms the first payment with usePaymentIntent(), the same way you confirm a one-time payment, and tells the page when the payment succeeded:
<script setup>
import { usePaymentIntent } from '@vue-stripe/vue-stripe'

const props = defineProps({ clientSecret: String })
const emit = defineEmits(['paid'])

const { confirmPayment, loading, error } = usePaymentIntent()

async function subscribe() {
  const result = await confirmPayment({
    clientSecret: props.clientSecret,
    confirmParams: { return_url: window.location.href },
    redirect: 'if_required'
  })
  if (result.paymentIntent?.status === 'succeeded') {
    emit('paid')
  }
}
</script>

<template>
  <div>
    <button :disabled="loading" @click="subscribe">Subscribe</button>
    <p v-if="error">{{ error }}</p>
  </div>
</template>
A paid first invoice is what makes the subscription active, but the page should not take the browser's word for it. Ask Stripe instead: add this block to server.mjs, above res.statusCode = 404, and restart the server:
  const subscriptionUrl = req.url.match(/^\/api\/subscriptions\/(sub_\w+)$/)
  if (req.method === 'GET' && subscriptionUrl) {
    const subscription = await stripe.subscriptions.retrieve(subscriptionUrl[1])
    sendJson(res, { status: subscription.status })
    return
  }
In src/App.vue, import the button under the other imports:
import SubscribeButton from './SubscribeButton.vue'Add a status ref and a function that reads the status from your server, under startSubscription:
const status = ref('')

async function checkStatus() {
  const response = await fetch(`/api/subscriptions/${subscriptionId.value}`)
  status.value = (await response.json()).status
}
Then replace the VueStripeProvider part of the template. The button goes under the Payment Element, and the status replaces the payment form once it is known:
    <VueStripeProvider v-else-if="!status" :publishable-key="publishableKey">
      <VueStripeElements :client-secret="clientSecret">
        <VueStripePaymentElement />
        <SubscribeButton :client-secret="clientSecret" @paid="checkStatus" />
      </VueStripeElements>
    </VueStripeProvider>

    <div v-else>
      <p>Subscription {{ subscriptionId }} is {{ status }}.</p>
    </div>
Reload the page, enter ada@example.com, click Continue and then Card. Enter:
- Card number:
4242 4242 4242 4242 - Expiration date:
12 / 34 - Security code:
123 - Postal code, if the form asks for one:
10115
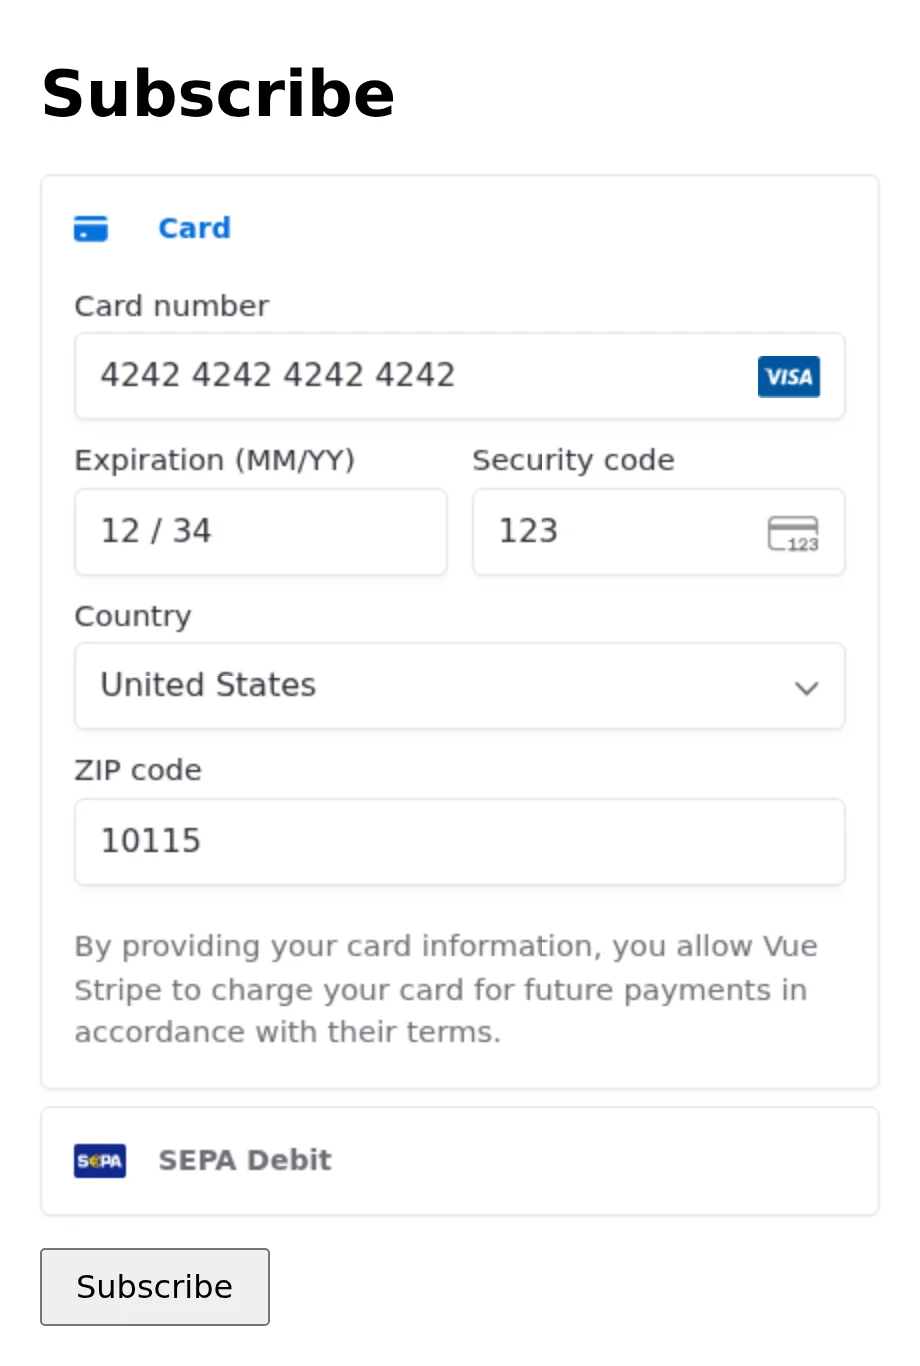
Click Subscribe. After a second or two, the form is replaced by:
Subscription sub_1UZVQlEfCmJMLhhrLvjXhshS is active.Open Subscriptions in the Stripe Dashboard. The list starts with an Active subscription to Basic for ada@example.com, €5.00 per month. Open it to see the paid first invoice and the Visa card ending in 4242, which Stripe charges again next month.
Step 8: Subscribe with 3D Secure
Some banks ask the customer to confirm the first payment. Reload the page, subscribe with ada@example.com again, and pay with the card number 4000 0025 0000 3155 and the same other details.
A window titled 3D Secure 2 Test Page opens over your app. Click Complete. The window closes and the page reads:
Subscription sub_... is active.usePaymentIntent() ran the 3D Secure step for you. This card asks only for the first payment, so the monthly charges go through without the customer.
Step 9: Subscribe with a declined card
Reload the page, subscribe with ada@example.com again, and pay with the card number 4000 0000 0000 0002.
The bank declines the card. The Payment Element marks the card number in red with Your card was declined., and the text under your button reads:
Your card has been declined.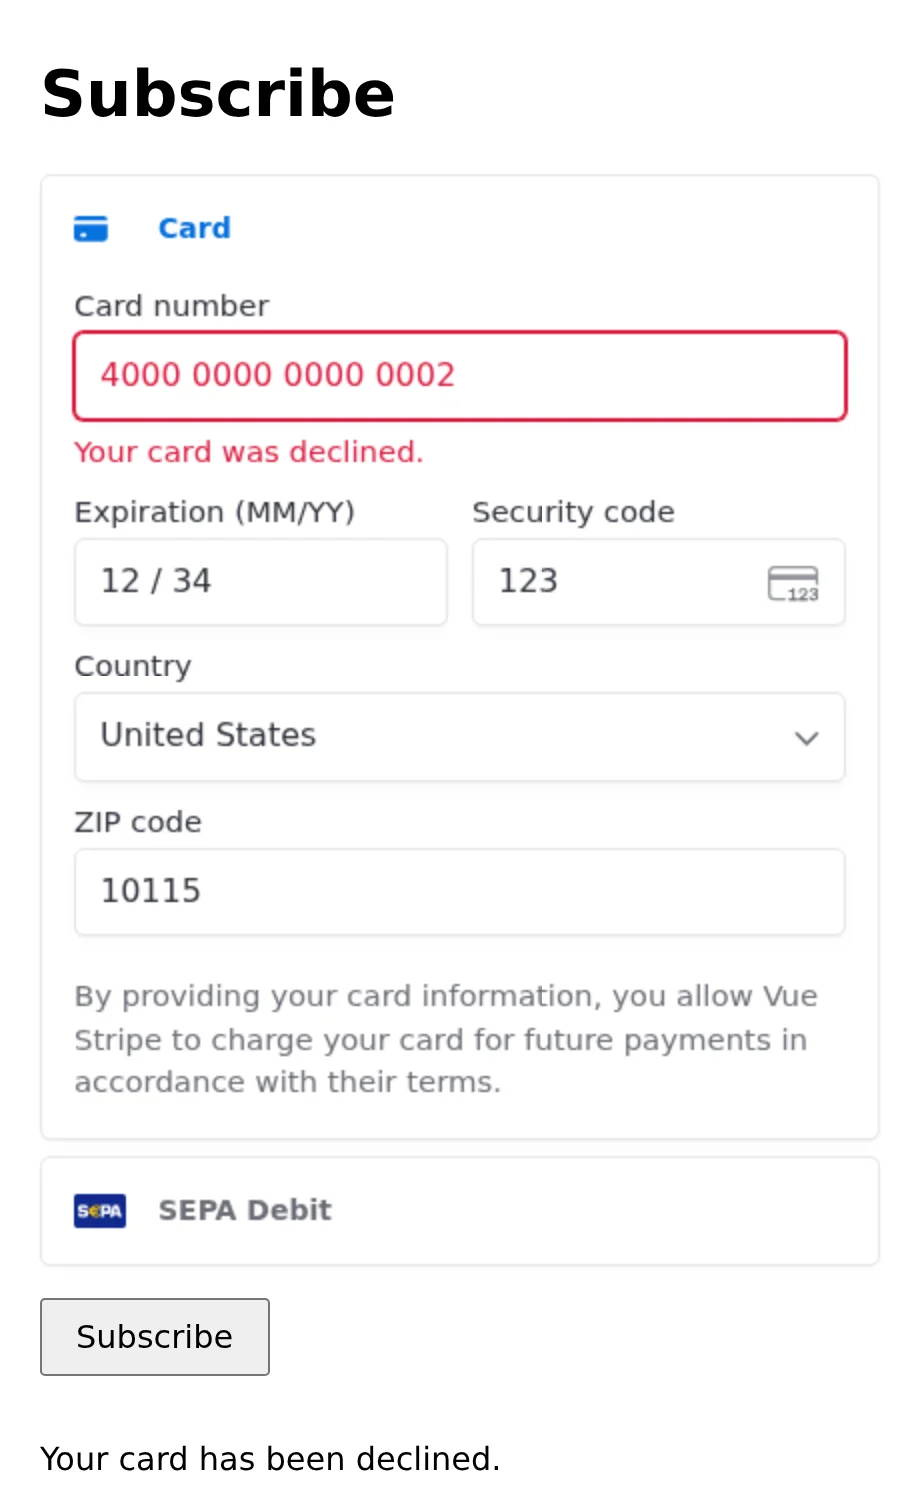
In the Dashboard, the newest subscription is Incomplete: it exists, but it is not paid, so the customer should not get access yet.
The first payment stays open, so the customer can try another card. Replace the card number with 4242 4242 4242 4242 and click Subscribe again, without reloading. The page reads:
Subscription sub_... is active.Open Customers in the Dashboard. There is one customer for ada@example.com, with all the subscriptions you created in this tutorial, because the server reused it each time.
Step 10: Cancel the subscription
Your server learns the subscription's ID when it creates it, before the customer pays. A real app stores that ID with the user, and uses it later to cancel, change or look up the subscription. Your app keeps it in subscriptionId; use it to cancel.
Add this block to server.mjs, under the GET block from step 7, and restart the server:
  if (req.method === 'DELETE' && subscriptionUrl) {
    const subscription = await stripe.subscriptions.cancel(subscriptionUrl[1])
    sendJson(res, { status: subscription.status })
    return
  }
In src/App.vue, add a function under checkStatus:
async function cancel() {
  const response = await fetch(`/api/subscriptions/${subscriptionId.value}`, { method: 'DELETE' })
  status.value = (await response.json()).status
}
And a button under the status line:
    <div v-else>
      <p>Subscription {{ subscriptionId }} is {{ status }}.</p>
      <button v-if="status === 'active'" @click="cancel">Cancel subscription</button>
    </div>
Reload the page and subscribe with 4242 4242 4242 4242. The page now shows the Cancel subscription button, as in the picture at the top of this page. Click it. The page reads:
Subscription sub_... is canceled.In the Dashboard, the subscription is Canceled, and Stripe will not charge the card again. subscriptions.cancel ends the subscription right away; to let the customer keep access until the end of the month they paid for, update the subscription with cancel_at_period_end: true instead.
What you built
You built a subscription page in five parts:
create-plans.mjscreated a product and a monthly price for each plan, with lookup keys the server finds them by.server.mjslists the plans, finds or creates the customer, creates anincompletesubscription and returns its first payment's client secret. It also reads and cancels a subscription by its ID.VueStripeProvider,VueStripeElementsandVueStripePaymentElementshow the payment form for that client secret, the same as for a one-time payment.SubscribeButton.vueconfirms the first payment withusePaymentIntent(), which also ran 3D Secure and showed the decline.App.vueasks your server for the subscription's status once the payment succeeds.
Your page saw the first payment only. Next month's charge, a failed renewal and a cancellation from the Stripe Dashboard happen while nobody has your page open, so a real app grants and removes access from webhooks. Start a subscription lists the events to handle.
Stop both servers with Ctrl+C in each terminal.
Next steps
- Start a subscription: the same flow for a production app, plus Stripe Checkout, free trials and saving a card before choosing a plan.
- Fulfil orders with webhooks: keep access in sync with renewals, failed payments and cancellations.
- Test your integration: test renewals and failed renewals with test clocks, without waiting a month.
- Embed a pricing table: let Stripe show the plans and run the checkout.
- Embed Stripe Checkout: a subscription checkout that Stripe builds, on your page. To attach it to an existing customer, pass
customerwhen you create the Checkout Session;client_reference_idis only your own label and does not choose the customer. - Collect details before creating an Intent: show the Payment Element before the subscription exists.